Bone In 60 Seconds: Four Simple Steps For Autograft Bone Harvesting
Many surgeons utilize some form of bone grafting and/or biologic substitute in cases involving fusion of two bones or difficult to heal fractures with bone defects. There are many options available in terms of what kind of biologic or non-biologic substitute one can use in situations in which bone is necessary to both help fill a void and assist in the healing process.1 It is important to note, however, many of these products aim to demonstrate their value in terms of helping the healing process by comparing them to one thing: the patient's own tissues.2
Some of you may ask, “Well, shouldn't we simply use the patient’s own bone and tissue instead of going for expensive, off-the-shelf alternatives that offer no added benefit other than what's already there in front of us?” After asking the same question early into his practice, the senior author decided to start using the patient's own bone and blood when appropriate for several reasons. The senior author has never looked back.
First, it takes very little additional time to perform your own bone harvest. In cases in which cancellous bone is necessary,

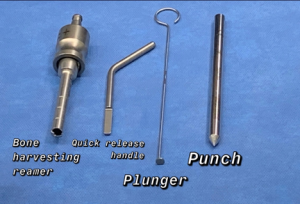
we will almost always harvest from the lateral calcaneus or the proximal tibia. To do this, we utilize a commercially available and reusable bone harvesting reamer system (see photo to right). This typically adds no more than 60 to 90 seconds to the case time and is very easy to do.
Second, the anatomic sites for harvest are safe with few at-risk structures. When we utilize the lateral calcaneus, our harvest site is inferior to the peroneal tendons and the sural nerve, and away from the joint. The incision is typically one cm wide and usually closed with a single horizontal mattress stitch with 3-0 nylon. When using the proximal tibia, an area plentiful in available cancellous bone, we usually go between the tibial tuberosity and Gerdy's tubercle laterally, utilizing an incision about two to three cm wide. Here we can also easily take bone from an area where there are not many at-risk structures.3
Third, there is very little associated morbidity with these harvest sites. Often, the patient asks during suture removal, “What's that stitch from again?” The patient forgot about the bone harvest because there was no pain to that area and the incision is so small.4
Lastly, while it may be easy to reach for commercially available products, there is no denying that doing so ultimately adds costs to your case. Many institutions or centers may be reluctant to allow for any added cost that is not absolutely necessary. By harvesting autograft, not only is there no added cost, there is indeed an added procedure that has its own CPT code. This is true for almost any kind of harvesting we do from the patient, whether we are harvesting cancellous bone, structural grafts such as iliac crest or calcaneus, and even bone marrow aspirate concentrate. These all have associated CPT codes. 
There are typically four simple steps for my calcaneal cancellous bone harvest that I will outline below, as it is my preferred harvest site. First, I mark out an oblique, one cm incision, which is typically about two fingerbreadths anterior to the most prominent point of the calcaneal tuberosity. Inferior and posterior to the sural nerve and peroneal tendons, this area is a safe zone for harvest (see box A in photo to right).
Next, after I make my incision, I utilize a freer elevator to bluntly dissect down to the bone of the lateral calcaneal wall (see box B in photo to right).
The next step is breaking through the lateral wall, utilizing a punch and mallet that is part of the harvesting kit (see box C in photo to right).
Finally, we perform our harvest utilizing a commercially available bone harvesting reamer that connects to a standard hand power system of choice. The reamer has an anterior orientation, which allows you to drive until you reach the far cortex and feel the blunt tip hit the inner wall. Once we have enough bone (typically, this area is appropriate for harvesting three to four grams of bone), we then flush the area with saline and can close with a single horizontal mattress stitch (see box D in photo to right).
With four simple steps, we have bone in 60 seconds.
By Ali Rahnama, DPM, AACFAS and Jered Stowers, DPM
Dr. Rahnama is a fellowship-trained foot and ankle surgeon. He is an Assistant Professor at the Georgetown University School of Medicine in Washington, D.C. You can follow him on Instagram @DrAliRahnama for interesting cases and educational material.
Dr. Stowers is a third-year resident with the MedStar Health Podiatric Surgery Residency Program in Washington, D.C.
References
- Wee J, Thevendran G. The role of orthobiologics in foot and ankle surgery. EFORT Open Rev. 2017;2(6): 272–280.
- DiGiovanni CW, Lin SS, Baumhauer JF, et al. North American Orthopedic Foot and Ankle Study Group. Recombinant human platelet-derived growth factor-BB and beta-tricalcium phosphate (rhPDGF-BB/β-TCP): an alternative to autogenous bone graft. J Bone Joint Surg Am. 2013;95(13):1184-1192
- Myeroff C, Archdeacon M. Autogenous bone graft: donor sites and techniques. J Bone Joint Surg Am. 2011;93(23):2227-2236.
- Benninger B, Ross A, Delamarter T. Approaches to proximal tibial bone harvest techniques. J Oral Maxillofac Res. 2012;3(2):e2.


